Wednesday, July 17

Read Around the World


"Reading gives us a place to go when we have to stay where we are."

  
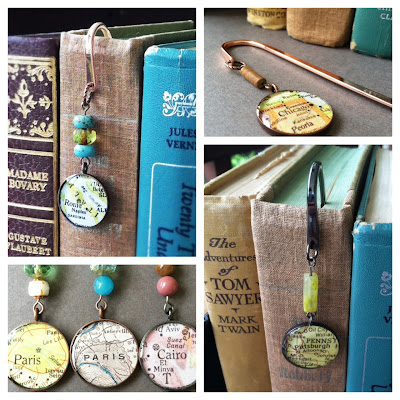
Map Bookmarks available from my Etsy shop.

 
I've been wanting to offer more map items in my shop, something other than jewelry, and something that could be used by both women and men. When my order of bezels and bookmark hooks came in I went to work making a few using maps from my collection of vintage atlases.
 
I ♥ maps
 
I ♥ books
 
...so it's a prefect combination...
 
Very few of us can travel as often as we would wish, but through the pages of some wonderful books we can visit those same places in a unique way that enriches our perspective of the world.
 
By far, the vast majority of books I read are set in either the United States or Great Britain, but there have been a few set in other lands that have really made me feel as though I traveled to that very place, imparting a unique sense of a previously unknown place, or culture, or era.
 
Off the top of my head, I remember with fondness:


What have you read that took you on a journey around the world?


Monday, July 1

Resin and Felt

I've been having fun playing with some previously made resin cabochons and trying to make something new. Here's what I came up with...


Bright little accessories that add a little fun wherever you place them.
 
Clips for your hair, or with pin backs to jazz up a scarf or bag.
 
Cross body bag from Olive Tree Textiles on Etsy

These were made with different layers of colored felt, embroidered with contrast stitching, and then with the resin cabochon glued to the center.
 
Cured resin can be tough to glue to other materials. It's essentially a plastic, and like other plastic glue will just peel right off. I thought of adhering the cabochons with more resin, which would bond really well, but with the long cure time I was worried about securing the cabs in place while it dried, or having the viscous resin seep through the felt and create a big mess.
 
I tried something I had called Weld-bond, which is supposed to work on porous and non-porous surfaces, but even after I let it dry undisturbed for over 24 hours, I could pop the cabochons off with little effort.
 
So Super-Glue to the rescue! It bonds very quickly, so I just held the cabs tightly in place for a few seconds and they are stuck like, well... glue :)  I've given them a good tug (not like a crazy person, but with a reasonable amount of force) and I'm fairly confident they will stand up to regular use. I've attached one to my bag which sees a fair amount of action, so that'll be the true test.
 
 
I'm curious to hear from others...
 
To what other materials have you attached resin?
 
What worked well? What didn't?


Monday, June 17

A Little Bit of Everything

My shop and posting as been on a bit of a lengthy hiatus. My, my, it's been a crazy year and a half - with a new baby, an emergency hospitalization for myself and two surgeries, and then beginning home schooling for my older boys. But I think we've finally got things running smoothly and hopefully there will be no more surprises. No bad surprises anyway...I'm all for the good ones of course!

To be honest, chaotic life aside, I've been in a creative slump. Especially with my jewelry and Etsy shop. My map necklaces have been quite popular, and especially with custom orders it sucked up all my time so that none was left to play with new ideas. It was feeling tedious. Uninspiring. I felt trapped.

It was a relief to just close down for a while. Now I have a renewed energy and am so excited to start doing something creative again! It started with a new-found passion for embroidery.


 I made these little softie baby blocks for a friend who's expecting her first child this summer. She loves owls and is also very into more natural type toys, like those made of fabric and wood, so I wanted to give her something unique and special. She's a very accomplished seamstress herself, so I felt a little embarrassed to present her with my amateur work, but she really liked them - whew! (Well of course she would; she's super sweet!)

Anyway, I've always loved the look of embroidery, but didn't know what all was involved and thought it would be much too complicated. Now I'm glad I was seized by the desire to give it a try because it wasn't nearly as hard as I had imagined. And,

I

fell
 
in
 
love.
 
 
The owl and fox above are both compilations of various designs I found online (aka Pinterest). But now I see how its done, my head is swimming with ideas and the sheets of paper filled with doodles are beginning to pile up.


Exercising some creating thought sparked other imaginings. Here are some resin cabochons I made ages ago that have been languishing in the arts and crafts closet. I've pulled out some leather, lace, and felt, and am determined to combine these into some unique accessories. There are six made already, so stay tuned!


 Pride and Prejudice resin and copper bookmark
 
I've added a couple of resin and copper bookmarks to the shop, and would like to add more soon.


Custom map bracelet resin bangle
 
Maps, glorious maps!
They are still one of my first loves. I'm pleased to have added this new bracelet design, with customizable options. This one is with a silver bangle type bracelet, but I'm going to add leather and cotton corded options in a few days.
 
In the beginning, I mentioned being burned out on making map necklaces, but I have a renewed zest! I've been honored with some very special custom orders lately, including gifts for wedding parties, foreign exchange students, and graduates. I absolutely love it when my customers share their stories; it brightens my whole day knowing I've made something that carries special meaning for another. Its that connection that makes the handmade market so unique and enjoyable.
 
A final note:
In getting my act together, I noticed with some embarrassment that there are several comments that were posted months ago with questions about resin techniques, that due to my circumstances went unanswered. My sincere apologies. Although it comes late, I will try to respond to these questions in the next few days to weeks so that they may help others in the future at any rate. Perhaps a post of just answering questions is in order.
 
Be in touch soon!

Tuesday, November 15

Made It! Monday - Apple Chips


So I'm a little late, posting on Tuesday. But I did make these on Sunday, so it averages out to Monday, right? :)

I saw apple chips on Pinterest and instantly became obsessed with the promise of crispy, crunchy, cinnamon-y apple goodness.

If you do a web search for "Apple Chip Recipes", you'll be met with pages of suggestions, but it looked like it basically boiled down to two different methods and two different suggested temperatures.

I spent the weekend testing them out and finding my favorite. Here's the steps, and options, if you'd like to give it a try (it's really not hard, and so worth it!)

1. Option One: Your Apple
You could try absolutely any variety. The normal "baking" apple rules don't apply, since they will all turn crispy during the process. I tried Red Delicious, Granny Smith, and Braeburn.
Granny Smith was my favorite, hands down.

2. Option Two: The Prep
You next have the option of peeling and coring your apples first, or just leaving them whole and slicing. I tried both ways and it was quickly apparent that peeling and coring was a waste of time. Once they are dried and crispy, the peel and core bits just blend in with the rest of the crunch - texturally, I didn't notice them at all. You do need to pop out the seeds, but I found they mostly fell out by themselves during baking.

3. Next, slice your apples as thinly as possible. I used my nifty "as-seen-on-TV" mandolin slicer, which did the job lickety-split!

4. Here's your next option, according to the two popular methods: soaking your slices in a simple syrup, or tossing with sugar & cinnamon, or leaving plain of course...

I did try the simple syrup, which you can make to various proportions. I made it kind of light - 1 cup water to 1/2 cup sugar (this was for one apple). Recipes suggested soaking your slices at least 1/2 hour up to overnight. I soaked mine somewhere around 2-3 hours. When it was all said and done, to me there was no difference from the slices simply tossed in sugar, so again, this seemed like another waste of time...

The flavors:
I decided all my experiments from then on would just involve tossing the apples in my desired mixture of sugar and flavor.

I tried:
plain
plain with cinnamon sprinkled on top
plain with pumpkin spices sprinkled on top
tossed with sugar only
tossed with sugar and cinnamon
tossed with sugar and pumpkin spice

When I saw the pumpkin spice in my cabinet I thought it was truly an inspired idea. But it wasn't that good - I liked the regular cinnamon much better.

My favorite flavor was the sugar and cinnamon mixture, and simple plain the runner-up.

You could mix your cinnamon and sugar to any proportion. I played with the amounts on several different batches, and my favorite ended up being 1 Tbs sugar and 1/2 tsp cinnamon (per apple).


5. Lay your apple slices in a single layer on parchment lined baking sheets.

6. Last option - Temperature
Half the recipes I looked at recommended baking at the lowest your over can go, generally 175 F. The other half recommended 250 F.  I tried it at 250 degrees twice, but both times I couldn't get them to turn crispy before burning.

So 175 it was for me! At this temperature, it took nearly 4 hours for my apple slices to turn crispy. (There's a huge range between 175 and 250, so it seems likely that with a little experimentation, there's a better temperature for speeding up the process without burning.) I would recommend letting them go for about 2 hours, then checking on them at 30 minute intervals. Even when they are done, they will appear rubbery when warm. So to test them, pull a chip off your baking sheet and let it cool completely (about 1-2 minutes). If it's still a little chewy, let them go a little longer. If they're delightfully crunchy, well you'll know, and then it's up to you to resist devouring every last one!

The only downside is that they do take quite a long time to bake. But it just means that your house is filled with a wonderful aroma, torturing you for hours...

The prep is actually quite fast (especially with a mandolin), so you can whip out a batch, pop 'em in the oven and busy yourself elsewhere while you wait.

These are going to be a new snack staple in my home - I hope you'll give them a try as well, and let me know what you think!



Monday, November 7

Made It! Monday - Felt Flower Wreath


Here was the inspirational pin:


This gorgeous wreath was created by Nest of Posies. I love vibrant colors and the black and white stripes - so eye-catching!

But I love how you can take a great idea and still make it your own.
Here's how I put it together:


You'll need:
  • Wreath. (I bought mine at a craft store, but then saw this idea that will only cost you $1.)
  • Felt. Since this is going outside, I just used the cheap craft felt - I think they are 9" x 12"?
  • Fabric - I didn't have any striped fabric, but I found this fun zebra print bandanna for $1 at Michael's.
  • Scissors
  • Glue Gun

 There are so many different ways to make felt flowers and if you do a quick search on google or pinterest you can easily pull of a plethora of great tutorials.

I chose to make just 2 types - pompoms and roses.

To make the pompoms:

  1.  From the longest side of your felt, cut a strip 2" wide. Lay down a thin line of hot glue on the bottom edge (long side) and fold over.
  2. On the folded edge, make 1/4" wide cuts all along the length of your felt strip. Cut on the fold towards the raw edge, stopping before you reach the hot glue. It doesn't need to be exact, but leave maybe 1/4" or so un-cut.
  3. Then, start rolling it up from one side, securing with hot glue as you go.
  4. Here's how the underside will look.

If you'd like a bigger flower, add another felt strip - just continue rolling where you left off. You could even use another color for an extra fun look.


To make the roses:

  1. Cut a circle of felt. (I traced a circle using a dessert plate, about 6" in diameter, which produced a 2 - 2 1/2" rose. To make a larger or smaller rose, simply change the size of your circle.)  Cut the circle into a spiral, about 1/2" wide.
  2. Starting from the outside edge, start rolling the felt. To make the rose petals, twist/fold the felt as you roll it. It's a little hard to explain in words exactly - but it truly isn't complicated, once you give it a try you'll figure it out lickety-split! Secure with hot glue as you go...
  3. Here's how the underside will look with the twisting and rolling.
  4. And here's the front.

For another felt flower design, roll your spiral, but don't twist it - cute!


Next, the wreath:


  1.  Cut your fabric (bandanna in this case) into strips, approximately 3" wide.
  2. Wrap around your wreath base, securing with hot glue here and there to hold in place.
  3. Arrange your felt flowers as you like them, and attach with more hot glue (oh boy, I love that stuff!)
  4. Voila!

This was sort of a two-for-one pinterest challenge, because I've been wanting to make some felt flowers forever! Turns out, they were super easy. I have a stash of nice quality wool felt in super yummy colors and can't wait to use my new skills making some fun felt flower pins, and maybe some hair clips.


But that may have to wait a bit, as I already decided what to make for this weeks challenge - it's something practical, simple, and makes a great gift....


Saturday, November 5

New Tutorials Coming Soon!

While sitting at the computer drinking coffee and trying to wake up, I embarked on a bit of autumn "spring" cleaning of computer files, and stumbled upon a whole series of tutorials I had planned to share, including:


 open bezel casting, and:


how to make your own resin molds.

"Oh, yeah...." thought I.

That was months ago. I guess I became a little distracted by, well - pregnancy. OK, fair enough. But I really would like to finish those up. My existing photos are however, how to put it gently?.... lousy.

So I'm going to focus and give myself a deadline to re-do and publish these tutorials by the beginning of December.

So stay tuned, because it's really fun stuff!!

Thursday, November 3

Before you speak...think.


What a wonderful reminder....

I'm going to try and put this into action.

And even though I spend the majority of my time alone with my children, I'm reminded even more so how important it is to be mindful of the words I choose. It's all too easy to drop your guard, and not worry about how you're perceived by those with whom you've become so familiar. But shouldn't we be the kindest to those we love the most?