
I call these "glow rings" because the effect of white paint under transparent resin just seems to have that cool, funky "glow".
You can adapt this technique for many other designs, but here are the basics:

You will need:
Resin (including mixing cups and stir sticks)
Resin jewelry mold -
(for these rings, I am using the 3/4" cabochon mold)
Transparent Resin Dye
Black Opaque Resin Pigment
White Paint
(I am using acrylic because it is easy and dries fast,
but you could use any kind, including paint markers.)
Fine tipped paint brushes

Mix up a small batch of resin and color it with your choice of transparent dye.
Fill the mold cavities with the colored resin 1/2 to 3/4 full.
(The deeper this transparent layer is, the more dramatic the effect.)
Allow to cure until it is completely hard and dry to the touch.
(Overnight will do the trick.)

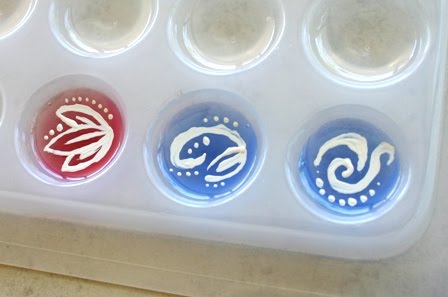
On top of the cured layer of resin, paint any design you like.

You can do simple geometrics or get fancy if you are skilled with a brush (unlike me!)
I've found using a fine tipped paint marker offers much better control, but mine was not working today - (sigh)
Allow the paint to dry completely.

Once the paint has dried, mix up another small batch of resin and color it with black opaque pigment.
Pour the black resin on top of your painted designs, filling the cavities.
And let cure.

Once the final layer of resin has cured, you can pop them out of the mold:

It's hard to capture in a photo - but I just love this effect!

You can see here what a difference the depth of the first transparent layer makes.

The pink one is about half transparent, half black opaque.
The aqua is nearly all transparent with just a thin final layer of black.

Finish the pieces as desired; sanding rough edges and polishing if needed.
To make a ring, affix the cabochon to a ring blank using a glue or epoxy.
(I used E6000)

Press firmly onto the back of the cabochon and let dry.

Viola!

Now that you've made a groovy, glowing ring, here are some variations to try:
Use larger molds to facilitate more complicated designs.

And turn them into pendants.
Experiment with different shapes and colors.

When pouring your first layer, blend 2 or more colors for a swirling effect:

Have fun!

2 comments:
Voila
Your resin glow ring is an awesome inspiration! Many thanks for sharing. I would like to feature your designs at http://www.handmade-jewelry-club.com/
Contact me here if you have a concern.
Jane
http://diylessons.org/
Post a Comment