Showing posts with label crafts. Show all posts

Wednesday, April 13

Welcome Home Wreath


I've seen so many lovely wreaths in the blogosphere lately, and I really, really wanted one. If you look closely at the ugliness of our front door (which I cropped out as much as possible) you'll see how much we really needed a cover-up!

Here's my $4 dollar-store wreath. If you had any of this stuff on hand, you could make it even cheaper. The dollar store has these skinny, skimpy wreaths, so I bought two - one smaller and one larger and nested them together to beef it up a bit. I also bought a roll of moss-tape which I wound around the larger wreath. (I think it would have looked just as nice without though, so I could have totally saved a dollar and bought, say, another plastic organizing bin. Seriously, I need to stop buying those!)

The red flowers were also $1, attached and snuggled closely together for extra fullness. They also had a nice ivory shade of the same flower, and I think a mono-chromatic scheme would have looked really classy, but we needed the color pop.


I made the three paper flowers from my pages of my collection of old, destroyed books that I'm slowly tearing apart for various uses. I used the same book and a piece of scrapbook paper to create the mini bunting banner and paper bow. The bunting and bow are coated in mod-podge for added protection against the elements. I left the paper flowers untouched as a little weathering could only enhance the look (I hope.)


All components were assembled with hot-glue for super-duper easiness (though I burnt my finger at the VERY end, completely needlessly I might add!)

So anyway, if you've got a hankering to craft your own wreath, hope this adds to the inspiration pool...


Make it Yours @ My Backyard Eden
The Trendy Treehouse

Tuesday, February 15

Kid's Craft - Field of Sheep

My kids are still a bit too young to do many projects on their own, which means when they want to do a craft *I* am actually doing all the work while they smear glue on the table and complain about how long I'm taking.

So the crafts for kids I share here on my blog aren't going to be stunning, gallery worthy showpieces. They're going to be the kind that little kids (preschool - primary) can do with minimal assistance.

The boys loved this one (anything with animals, of course).


A field of sheep...baaa


You will need:


Various shades of green paper, torn roughly into sqaures.
 (Depending on your child's abilities, they can do it or you can do it. For this project, I ripped and cut everything out and just set it all out for them to use.)
You will also need another sheet of green paper as your base.

 
Sheep bodies (ovals), heads, and legs - cut from black or white paper. I folded the paper into thirds and free-handed the cutting, so it cut several shapes at one time. The ovals are about 3-4" at widest point. I cut way too many legs as you can see, but they were so easy I couldn't stop...


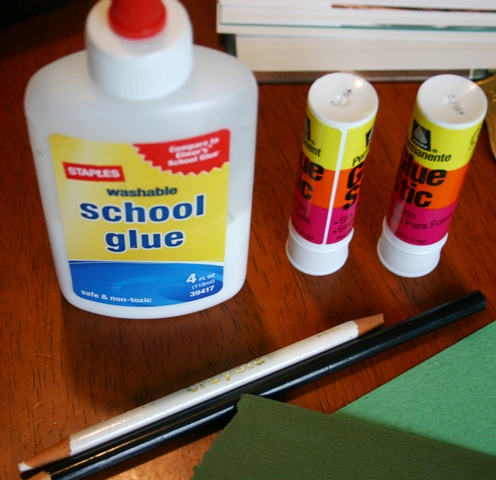
Finally, you need glue - we used glue-sticks flor gluing the paper portions and the white glue for gluing on the cotton. You also need pencils or something else to draw on the sheeps faces.

Directions:

Have your child glue the green sqaures onto the base paper to create your 'fields'.

Glue on the sheep bodies, heads, and legs. Draw some cute faces.


Gently pull apart a cotton ball to create wool. If you happen to have real wool, that would work great too!


Glue the now fluffy cotton onto the sheep's body.

You can demonstrate how to asssemble one sheep and then just leave them to it...

 And you have yourself a field of sheep!

Here's the neighboring farm.

Have a woolly-good time!


Tuesday, February 1

Make Your Own Play Dough and a Porcupine Too


I've tried a few dough recipes, but they always seem a little too gritty. This one is smooth and soft - fairly close to the store-bought version - and stays amazingly soft and pliable even after being left out for hours (or overnight in our case).

Here's what you need:

1 cup flour
1 tablespoon vegetable oil
1 cup water
1/2 cup salt
2 teaspoons cream of tartar
optional:
food coloring
glitter
scent - (you can use an extract like lemon or vanilla)

Combine all your ingredients in a large saucepan. Stir with a wooden spoon over medium heat. Stir constantly. It will be very soupy for several minutes and then suddenly it will start sticking together and can be stirred into a ball. It will look very lumpy too - don't worry. Remove from the heat and keep stirring briefly. Turn the whole lump out on a floured surface and knead as it cools. Just for a few minutes - you'll see when it's the perfect consistency.

It will store nicely in Ziploc bags or of course, old play-doh containers (we've only got about 30 or so laying around). If you're not going to use it for a while, storing it in the fridge or freezer will make it last for a long time.

Here's an easy project for the little one's to make with their new dough.

You will need:
play dough
2 small beads or button (for eyes)
round toothpicks


1. Roll a handful of play dough into a ball.
2. Pinch one end to form a nose.


3. Press your beads into the clay to make eyes.
4. Cover with toothpick "needles".

 Here is my 3-year-old's version, (completely unassisted). I love that this is so easy, and yet adding the toothpicks takes a bit of time, so you'll have some peaceful moments as your kids are thoughtfully placing each one.

Here's another my 5-year-old. Don't you love the big eyes and goofy smile?

Have fun!

Saturday, January 10

New Year, New Hope, New Ideas


How interesting that the beginning of a new year comes during the season's coldest moments, and yet the excitement of change and a fresh start can bring to one's soul all the warmth and promise of Spring.


This year has already brought some good news for me. After spending nearly the whole of last year feeling constantly sick, weak, and losing an alarming amount of weight, I finally visited a naturopathic doctor who was able to discover quite a few medical issues, but more importantly, offer real solutions. Now, while starting an extensive regime of medications and supplements, I look ahead with real excitement. Truly, after a year of feeling lousy and run-down, I see on the horizon a whole new life: feeling good, having energy, being happy and vivacious and full of life.


This new found optimism has already recharged my spirit, it seems, and I'm ready to start anew in my aspirations as a mother, wife, and artist. With more energy, I can't wait to do more with my boys; to go more places, explore, do crafts and projects at home, and just have fun.


At home, I would love to finally get organized and scheduled. Laundry will always be the bane of my domestic life, but this year I am determined to get it under control and not a looming pile of doom. Then, for one of my favorite things: cooking. Yes, I love cooking, experimenting with new recipes, and finding something absolutely delicious to add to the dinner repertoire.


For my shop, and jewelry designing, I have a lot of big plans for the new year. I have been writing down ideas for new designs, and also want to experiment with completely new (new for me) techniques in resin. I've got my first batch of some new resin items curing right now, so stay tuned for some pics in the coming days.