Wednesday, July 17

Read Around the World


"Reading gives us a place to go when we have to stay where we are."

  
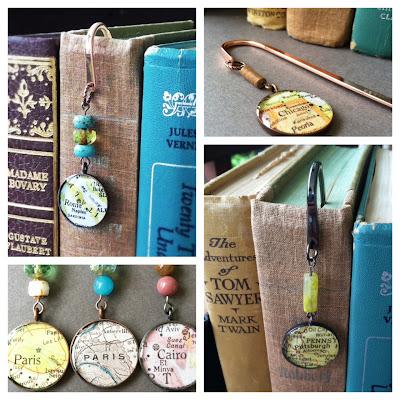
Map Bookmarks available from my Etsy shop.

 
I've been wanting to offer more map items in my shop, something other than jewelry, and something that could be used by both women and men. When my order of bezels and bookmark hooks came in I went to work making a few using maps from my collection of vintage atlases.
 
I ♥ maps
 
I ♥ books
 
...so it's a prefect combination...
 
Very few of us can travel as often as we would wish, but through the pages of some wonderful books we can visit those same places in a unique way that enriches our perspective of the world.
 
By far, the vast majority of books I read are set in either the United States or Great Britain, but there have been a few set in other lands that have really made me feel as though I traveled to that very place, imparting a unique sense of a previously unknown place, or culture, or era.
 
Off the top of my head, I remember with fondness:


What have you read that took you on a journey around the world?


Monday, July 1

Resin and Felt

I've been having fun playing with some previously made resin cabochons and trying to make something new. Here's what I came up with...


Bright little accessories that add a little fun wherever you place them.
 
Clips for your hair, or with pin backs to jazz up a scarf or bag.
 
Cross body bag from Olive Tree Textiles on Etsy

These were made with different layers of colored felt, embroidered with contrast stitching, and then with the resin cabochon glued to the center.
 
Cured resin can be tough to glue to other materials. It's essentially a plastic, and like other plastic glue will just peel right off. I thought of adhering the cabochons with more resin, which would bond really well, but with the long cure time I was worried about securing the cabs in place while it dried, or having the viscous resin seep through the felt and create a big mess.
 
I tried something I had called Weld-bond, which is supposed to work on porous and non-porous surfaces, but even after I let it dry undisturbed for over 24 hours, I could pop the cabochons off with little effort.
 
So Super-Glue to the rescue! It bonds very quickly, so I just held the cabs tightly in place for a few seconds and they are stuck like, well... glue :)  I've given them a good tug (not like a crazy person, but with a reasonable amount of force) and I'm fairly confident they will stand up to regular use. I've attached one to my bag which sees a fair amount of action, so that'll be the true test.
 
 
I'm curious to hear from others...
 
To what other materials have you attached resin?
 
What worked well? What didn't?


Monday, June 17

A Little Bit of Everything

My shop and posting as been on a bit of a lengthy hiatus. My, my, it's been a crazy year and a half - with a new baby, an emergency hospitalization for myself and two surgeries, and then beginning home schooling for my older boys. But I think we've finally got things running smoothly and hopefully there will be no more surprises. No bad surprises anyway...I'm all for the good ones of course!

To be honest, chaotic life aside, I've been in a creative slump. Especially with my jewelry and Etsy shop. My map necklaces have been quite popular, and especially with custom orders it sucked up all my time so that none was left to play with new ideas. It was feeling tedious. Uninspiring. I felt trapped.

It was a relief to just close down for a while. Now I have a renewed energy and am so excited to start doing something creative again! It started with a new-found passion for embroidery.


 I made these little softie baby blocks for a friend who's expecting her first child this summer. She loves owls and is also very into more natural type toys, like those made of fabric and wood, so I wanted to give her something unique and special. She's a very accomplished seamstress herself, so I felt a little embarrassed to present her with my amateur work, but she really liked them - whew! (Well of course she would; she's super sweet!)

Anyway, I've always loved the look of embroidery, but didn't know what all was involved and thought it would be much too complicated. Now I'm glad I was seized by the desire to give it a try because it wasn't nearly as hard as I had imagined. And,

I

fell
 
in
 
love.
 
♥
 
The owl and fox above are both compilations of various designs I found online (aka Pinterest). But now I see how its done, my head is swimming with ideas and the sheets of paper filled with doodles are beginning to pile up.


Exercising some creating thought sparked other imaginings. Here are some resin cabochons I made ages ago that have been languishing in the arts and crafts closet. I've pulled out some leather, lace, and felt, and am determined to combine these into some unique accessories. There are six made already, so stay tuned!


 Pride and Prejudice resin and copper bookmark
 
I've added a couple of resin and copper bookmarks to the shop, and would like to add more soon.


Custom map bracelet resin bangle
 
Maps, glorious maps!
They are still one of my first loves. I'm pleased to have added this new bracelet design, with customizable options. This one is with a silver bangle type bracelet, but I'm going to add leather and cotton corded options in a few days.
 
In the beginning, I mentioned being burned out on making map necklaces, but I have a renewed zest! I've been honored with some very special custom orders lately, including gifts for wedding parties, foreign exchange students, and graduates. I absolutely love it when my customers share their stories; it brightens my whole day knowing I've made something that carries special meaning for another. Its that connection that makes the handmade market so unique and enjoyable.
 
A final note:
In getting my act together, I noticed with some embarrassment that there are several comments that were posted months ago with questions about resin techniques, that due to my circumstances went unanswered. My sincere apologies. Although it comes late, I will try to respond to these questions in the next few days to weeks so that they may help others in the future at any rate. Perhaps a post of just answering questions is in order.
 
Be in touch soon!

Tuesday, November 15

Made It! Monday - Apple Chips


So I'm a little late, posting on Tuesday. But I did make these on Sunday, so it averages out to Monday, right? :)

I saw apple chips on Pinterest and instantly became obsessed with the promise of crispy, crunchy, cinnamon-y apple goodness.

If you do a web search for "Apple Chip Recipes", you'll be met with pages of suggestions, but it looked like it basically boiled down to two different methods and two different suggested temperatures.

I spent the weekend testing them out and finding my favorite. Here's the steps, and options, if you'd like to give it a try (it's really not hard, and so worth it!)

1. Option One: Your Apple
You could try absolutely any variety. The normal "baking" apple rules don't apply, since they will all turn crispy during the process. I tried Red Delicious, Granny Smith, and Braeburn.
Granny Smith was my favorite, hands down.

2. Option Two: The Prep
You next have the option of peeling and coring your apples first, or just leaving them whole and slicing. I tried both ways and it was quickly apparent that peeling and coring was a waste of time. Once they are dried and crispy, the peel and core bits just blend in with the rest of the crunch - texturally, I didn't notice them at all. You do need to pop out the seeds, but I found they mostly fell out by themselves during baking.

3. Next, slice your apples as thinly as possible. I used my nifty "as-seen-on-TV" mandolin slicer, which did the job lickety-split!

4. Here's your next option, according to the two popular methods: soaking your slices in a simple syrup, or tossing with sugar & cinnamon, or leaving plain of course...

I did try the simple syrup, which you can make to various proportions. I made it kind of light - 1 cup water to 1/2 cup sugar (this was for one apple). Recipes suggested soaking your slices at least 1/2 hour up to overnight. I soaked mine somewhere around 2-3 hours. When it was all said and done, to me there was no difference from the slices simply tossed in sugar, so again, this seemed like another waste of time...

The flavors:
I decided all my experiments from then on would just involve tossing the apples in my desired mixture of sugar and flavor.

I tried:
plain
plain with cinnamon sprinkled on top
plain with pumpkin spices sprinkled on top
tossed with sugar only
tossed with sugar and cinnamon
tossed with sugar and pumpkin spice

When I saw the pumpkin spice in my cabinet I thought it was truly an inspired idea. But it wasn't that good - I liked the regular cinnamon much better.

My favorite flavor was the sugar and cinnamon mixture, and simple plain the runner-up.

You could mix your cinnamon and sugar to any proportion. I played with the amounts on several different batches, and my favorite ended up being 1 Tbs sugar and 1/2 tsp cinnamon (per apple).


5. Lay your apple slices in a single layer on parchment lined baking sheets.

6. Last option - Temperature
Half the recipes I looked at recommended baking at the lowest your over can go, generally 175 F. The other half recommended 250 F.  I tried it at 250 degrees twice, but both times I couldn't get them to turn crispy before burning.

So 175 it was for me! At this temperature, it took nearly 4 hours for my apple slices to turn crispy. (There's a huge range between 175 and 250, so it seems likely that with a little experimentation, there's a better temperature for speeding up the process without burning.) I would recommend letting them go for about 2 hours, then checking on them at 30 minute intervals. Even when they are done, they will appear rubbery when warm. So to test them, pull a chip off your baking sheet and let it cool completely (about 1-2 minutes). If it's still a little chewy, let them go a little longer. If they're delightfully crunchy, well you'll know, and then it's up to you to resist devouring every last one!

The only downside is that they do take quite a long time to bake. But it just means that your house is filled with a wonderful aroma, torturing you for hours...

The prep is actually quite fast (especially with a mandolin), so you can whip out a batch, pop 'em in the oven and busy yourself elsewhere while you wait.

These are going to be a new snack staple in my home - I hope you'll give them a try as well, and let me know what you think!


Monday, November 7

Made It! Monday - Felt Flower Wreath


Here was the inspirational pin:


This gorgeous wreath was created by Nest of Posies. I love vibrant colors and the black and white stripes - so eye-catching!

But I love how you can take a great idea and still make it your own.
Here's how I put it together:


You'll need:
  • Wreath. (I bought mine at a craft store, but then saw this idea that will only cost you $1.)
  • Felt. Since this is going outside, I just used the cheap craft felt - I think they are 9" x 12"?
  • Fabric - I didn't have any striped fabric, but I found this fun zebra print bandanna for $1 at Michael's.
  • Scissors
  • Glue Gun

 There are so many different ways to make felt flowers and if you do a quick search on google or pinterest you can easily pull of a plethora of great tutorials.

I chose to make just 2 types - pompoms and roses.

To make the pompoms:

  1.  From the longest side of your felt, cut a strip 2" wide. Lay down a thin line of hot glue on the bottom edge (long side) and fold over.
  2. On the folded edge, make 1/4" wide cuts all along the length of your felt strip. Cut on the fold towards the raw edge, stopping before you reach the hot glue. It doesn't need to be exact, but leave maybe 1/4" or so un-cut.
  3. Then, start rolling it up from one side, securing with hot glue as you go.
  4. Here's how the underside will look.

If you'd like a bigger flower, add another felt strip - just continue rolling where you left off. You could even use another color for an extra fun look.


To make the roses:

  1. Cut a circle of felt. (I traced a circle using a dessert plate, about 6" in diameter, which produced a 2 - 2 1/2" rose. To make a larger or smaller rose, simply change the size of your circle.)  Cut the circle into a spiral, about 1/2" wide.
  2. Starting from the outside edge, start rolling the felt. To make the rose petals, twist/fold the felt as you roll it. It's a little hard to explain in words exactly - but it truly isn't complicated, once you give it a try you'll figure it out lickety-split! Secure with hot glue as you go...
  3. Here's how the underside will look with the twisting and rolling.
  4. And here's the front.

For another felt flower design, roll your spiral, but don't twist it - cute!


Next, the wreath:


  1.  Cut your fabric (bandanna in this case) into strips, approximately 3" wide.
  2. Wrap around your wreath base, securing with hot glue here and there to hold in place.
  3. Arrange your felt flowers as you like them, and attach with more hot glue (oh boy, I love that stuff!)
  4. Voila!

This was sort of a two-for-one pinterest challenge, because I've been wanting to make some felt flowers forever! Turns out, they were super easy. I have a stash of nice quality wool felt in super yummy colors and can't wait to use my new skills making some fun felt flower pins, and maybe some hair clips.


But that may have to wait a bit, as I already decided what to make for this weeks challenge - it's something practical, simple, and makes a great gift....


Saturday, November 5

New Tutorials Coming Soon!

While sitting at the computer drinking coffee and trying to wake up, I embarked on a bit of autumn "spring" cleaning of computer files, and stumbled upon a whole series of tutorials I had planned to share, including:


 open bezel casting, and:


how to make your own resin molds.

"Oh, yeah...." thought I.

That was months ago. I guess I became a little distracted by, well - pregnancy. OK, fair enough. But I really would like to finish those up. My existing photos are however, how to put it gently?.... lousy.

So I'm going to focus and give myself a deadline to re-do and publish these tutorials by the beginning of December.

So stay tuned, because it's really fun stuff!!

Thursday, November 3

Before you speak...think.


What a wonderful reminder....

I'm going to try and put this into action.

And even though I spend the majority of my time alone with my children, I'm reminded even more so how important it is to be mindful of the words I choose. It's all too easy to drop your guard, and not worry about how you're perceived by those with whom you've become so familiar. But shouldn't we be the kindest to those we love the most?

Tuesday, November 1

Fun with Frogs


The boys had some friends over and we pulled out the paint and got to try
some cute egg carton crafting...


For myself, I struggle with breaking away out from reality when it comes to art, and always want to make things the "right" colors. So I love working with kids and watching their wonderful creativity and individuality shine!


A little froggy pow-wow.

Monday, October 31

Made It! Monday... Felt Bird Mobile


Well I've definitely jumped onto the Pinterest bandwagon...so many creative, beautiful, and funny things to see there.

But I am determined to spend at least as much time actually trying out some of those amazing finds as I do simply perusing the boards....

Towards that end, I'm challenging myself to make/do/try at least one new thing each week and share it here on Mondays (that way I'll be obligated to not flake-out, right?)

So - this week's project was to finish up my felt bird mobile for baby's woodland nursery.

Here was my inspirational pin:


Their little birdies are made from plastic, but I have a huge crush on all things felt and so made these little tweets using wool felt, poly stuffing, and embroidery thread.


You can see I have an obvious lack of sewing skills, so if I can do it - you can do it! Imagine how cute these would be with some pretty stitching...

To construct the mobile I picked up some embroidery hoops (cheap! by the way) and unscrewed them to use the smooth inside loops only.

There are likely a hundred different ways to attach these, but I used what I had on hand - some 1/4" satin ivory ribbon - attached each bird at a different height for interest, and hung the finished mobiles from mug hooks screwed into the ceiling.

I had 8 birds, which turned into 2 mobiles - one for over the crib, and one over the changing table:


The trees in the inspirational nursery were vinyl decals - pretty, but kind of expensive. I used some white paint we had in the garage, which I actually liked much better since I could make the trees a little bigger and place them just where I wanted.

The birdhouses were only $4 in the wood crafts section of Michaels, paired with the perfect colors of acrylic paint...easy peasy!

It's only taken 2 months since Rowan arrived, but I'm glad I finally have it done!

I already have the materials for my next crafty challenge - it involves more felt and a zebra-striped bandana...

Sunday, October 23

Cufflink Invasion!


Our dining table has been invaded by a tiny army of cuff links. So they could tighten up their lines a bit, but they do remind me of little soldiers at attention.

I have the pleasure of working on a large custom order for an upcoming wedding, and decided it was a good time to re-stock existing cuff link locations and also add some new ones.

Looking for a fun and unique gift for a special man in your life? Check the shop soon - ready to ship cuff links will be listed shortly. And if you don't find just what you're looking for, I love custom orders...

Hope you had an equally productive weekend, or better yet a quiet, relaxing one!

Thursday, October 20

Look What You've Made!

I absolutely love it when my Resin Tutorial readers take some time to tell me about their journey into the world of resin and to share what they've made.

So there will be a new blog feature showcasing your own amazing designs!

To start things off, check out these stunning flower resin pendants, created by Chris, who sent me this lovely photo:


Chris said this was only her second attempt, and they turned out beautifully! Working with delicate flowers like these presents a lot of challenges including preserving their vibrant colors once embedded into the resin and also keeping those fine, soft petals from folding, breaking, and shifting. Chris did an amazing job - so very pretty!! ♥

So for all the rest of you out in blog-land, I would love to see some of the fun things you've made! You can email photos directly to me at jen_skinner@charter.net

Ooh, I can't wait to see more wonderful resin!

Friday, September 23

Back in the Saddle...A New Baby...and a Coupon!

So I'm now a mom of 3 boys! After an easy month filled with lots and lots of snuggle time, I'm finally getting back into some sort of productive routine. Of course our newest munchkin had to time his arrival with the start of school, which throws part-time homeschooling into the mix...so, while I say I'm "back in the saddle" I actually feel a bit more like the sheriff in this clip:


Any-hoo....
I figured it's time to take the leap and re-open the shop.

Eek! says me...

But really, I think it will be just fine. I'm going to hold off on doing custom orders for a bit longer just to keep it simple, but that likely won't last long.

As a special new baby celebration, I'm offering a special discount through the end of September. Enter coupon code 20OHBABY and receive 20% off your order! So stop by and pick out something special...

Finally, for your viewing pleasure, here are a few cute baby pics...
(Don't worry, I know how much everyone enjoys pictures of other people's children, but I'm a very proud mama so I HAVE to do it once, and get it out of my system....maybe.)


A very, very new baby.


My 3 sons!
(And yes, everyone asks if we're going to try for a girl...nope!
I love having boys - crazy, funny, goofy, and oh-so-sweet boys!!)


Skinny little legs...it won't last long!


Yes, I an in LOVE - again! ♥

Tuesday, June 14

Resin Artist Interview - Experience

I was so pleased to do an interview with Whitney, the artist behind Experience on Etsy. Her work embodies all the sparkly, vibrant colored goodness that attracts so many people to the possibilities of resin:

Red Resin Heart with Holographic Glitter

Whitney offers a lot of great tips for those just starting out, and lots of interesting tid-bits, so read on...

Q: Tell us a little about yourself. (anything you'd like to share...about your family, interests, where you live, etc...)


A: I live in a little college town in Georgia - Athens. I love this town! Athens has really helped to foster my artistic side and has so many great opportunities to further my craft. I attend the University of Georgia where I was recently accepted into the art program and will soon be taking my first class in jewelry and metalworking! I'm really excited to try and get into the Jewelry and Metalworking program so that I can learn some of the more intricate parts of crafting and add on to my current skill with resin. Hopefully my dreams will come true and this will all lead to fame and fortune. ;) School aside, I live with my boyfriend of 6 years and our cat, Luna. When we aren't working on things school or Experience Designs related we enjoy getting stuck on Youtube or Netflix, playing video games, and chillin' with the Luna.


Q: How did you get started working with resin?

A: I started working with resin in the summer of 2008 - It was a really fast kind of thing. I found the Etsy website first and then while I was browsing the jewelry category I kept coming across these unique jewelry pieces and I had no idea how people were making them. Cut to a few hours of research later and it's 3am and I've watched all the Youtube tutorials I could find on working with resin. The next day I went to the closest Michael's and found the EasyCast 2 part Resin and various other resin working supplies. My first resin batch was a mixmatching of items I found around my grandmother's house lol. I enjoyed the experience enough that inspired a lasting hobby turned career choice.


Q: Any advice you would like to share with those just learning the art of resin?

A: 1)Safety first!! Make sure you protect your skin! Wear some gloves - At first you may think that getting the resin on your skin doesn't have that bad of an effect, but the exposure will eventually cause your hands to get red and irritated. I have skipped on the gloves a few times because I hate the loss of dexterity in my fingers, but it really can be bad for you. Protect your skin, eyes, and lungs.

2)The next best tip I can give you that no one gave me when I was starting out is to buy some small, disposable measuring cups. At first I was using regular measuring cups where the smallest marked measurement was 1 ounce and making a 2 oz. batch of resin can be really difficult! 2 oz. will fill many molds and when you have that much at once it's hard to make quality, individual designs. I like to keep my batches under 1 ounce. I have found that medicine measuring cups work best and I buy them in sleeves of 100 on Amazon. :)

3)Have some patience. This is the one thing I've struggled with the most in improving my designs. When I first started working with resin, I liked to pour one round of resin and then it was done. Today my resin pieces have a minimum of 3 layers of resin, and when they are done I take the time to sand them with a resin sanding kit called Micromesh that I found on Amazon. A little bit of time can really make the difference in your resin pieces. :)


Q: I love your pieces – bright, fun colors and lots of sparkle! Are your designs the way you envisioned them when you started, or is it something that gradually evolved?

A: I would say it's half and half. I've always preferred jewelry that was bright and colorful and I obviously love sparkly things. ;) However, I didn't really have a set vision when I started making jewelry. I had thought about making more nature based pieces but I found that I had a natural attraction to working with glitter and bright colors. The first batch of resin I ever made contained a few pieces with colored sugar and even today that is one of my favorite materials to work with. I still love experimenting with different things to embed in the resin with my main criteria being 'Is it colorful?' or 'Does it Sparkle?' - That's honestly the best part about working with resin. It's a constant exploration, and the designs will always be evolving.


Q: Is there anything in particular that inspires you?

A: Nature is incredibly inspirational. Nothing can beat the silhouette of a winter tree against a flaming-red sunset or the twinkling of billions of stars and planets in the night sky... Haha, I got a little corny there, but it's still true. If ever I feel like I need some new ideas I just walk around outside and try to envision what certain things might look like if they were more... simplified and made shiny. lol It's hard to explain - Hopefully I'm making sense.


Q: What is your favorite item in your shop right now?
Sparkling blue/green elegant teardrop earrings

A: While I don't like to wear earrings this long myself, I can't help but fall in love with how they sparkle and move while they dangle.


Q: Is there another artistic medium that you would love to try but haven’t yet?

A: I really want to learn how to work with metal in a way that I can make my own bails and ring bases and other jewelry findings. Hopefully I'll learn this in my classes soon. :D


Q: Do you have any upcoming projects that you want to share with us?

A: Whenever I have the money to buy some mold maker, I am going to start making my own 100% unique molds! I'm really excited about it and I've already sketched out a few ideas for shapes I would love to have. New shapes will include mushrooms, owls, cats, and more! I wish I could say when in the future this will be, but I'm rather strapped for cash right now. D:


Q: Do you have any goals for this year you would like to share, relating to your art or your business?

A: I have a few goals, but my biggest is to establish a bigger local following. I've put a lot of work into my Etsy shop and I'm long overdue to put that kind of effort into 'real life'. I've started getting booths at craft shows and next on the list is to get some of my jewelry in the local shops. Sometimes I just feel like this is the year to seize to make sure that this all works out for me.


Whitney, thank you so much for providing us the opportunity to get to know you a little better!

Here are a few more of my personal favorites from her collection:


Love - Red Resin Pendant

I just "love" the vibrant color on this, and how it dangles on the diagonal - so cute!


Abstract Red White and Black Square Pendant

Great use of color -I especially like how Whitney used only the colored resins themselves to create this abstract design. It's a hard balance of blending them just the right amount without over mixing.


Resin Heart Pendant with Black and Silver Glitter

And of course, glitter! What a beautiful piece, using both different colors and different types of glitter for a really fun effect!


Don't you love her work? Well, you're in luck!

Whitney is offering all you lovely readers a special 15% discount for purchases made through her Etsy shop.
Just enter the code 13IOG at checkout.


You can connect with Whitney through the following:

Shop: www.experience.etsy.com

Blog: www.experiencedesignsblog.com

Twitter: www.twitter.com/ExpDesigns

Facebook: www.facebook.com/#!/pages/Experience-Designs/18731892409?ref=ts

Flickr: www.flickr.com/photos/experiencedesigns/

deviantART: www.experiencedesigns.deviantart.com

Wednesday, June 8

Pirates - Ahoy!

With our new baby due this summer, we took our "summer vacation" a little early this year. Which really worked out great - the San Diego weather was perfect, and with school still in the crowds were less than usual.

Here are a few of our highlights...

Legoland
Love this place - it is perfectly sized for smaller children and makes for a very fun and relaxing day...


We also visited the Maritime Museum and sailed the harbor on a mock pirate ship...


...complete with entertainment any lilly-livered land-lubber would enjoy.


Our little pirate loved it!
 
Now he can't decide whether he wants to be a pirate or a knight when he grows up.
 I've yet to break it to him that neither occupation is quite the same today.
 
And then, there was a lot of pool time.
 
Here's how I participated.
 
(Supervising, of course)
 
With a book in hand and a box of Trader Joe's
Roasted Pistachio Dark Chocolate Covered Toffee Candies within easy snacking range.
(wow, those are good!)
 
Hope you all get to take some vacation time this summer!
If you have a moment, I'd love to hear about your plans...we usually stay somewhere within California, so it would be interesting to hear where others from around the country or around the world spend their holidays...

Thursday, May 19

A Personalized Giveaway

In case you didn't already know, I love personalized jewelry - maybe a little something special for yourself, or to give that special someone a gift they'll really treasure.

There are quite a few shops, especially on Etsy, where you can get personalized jewelry - but this one really stands out from the crowd.

Just feast your eyes on these lovelies from Magic Hand Jewelry:

 Personalized Sterling Silver Name Pendant
Sterling Silver Monogrammed Ring


Sterling Silver Heart Monogrammed Necklace

Here's the fun part:

The RikRak Studio Blog is hosting a super giveaway where you can win
the Sterling Silver Monogrammed Necklace!

Click the link below to enter:


Wednesday, May 18

Sunny? San Diego

Just a few more days until we head out for our San Diego vacation. It seems to have become an annual event for our family. There is just so much to do there, especially for families with children, and the city (as big cities go) is beautiful.

It's just so suddenly gray and gloomy where we live (about 6 hours north of the big SD) that I'm worried it will be the same once we get down there. And the boys are ready for some serious pool time as well as a visit to Lego Land water park...

So - SUN, please come back...I miss you, I need you...

Either way, I will still thoroughly enjoy the time to relax. Even more so, I'll enjoy sharing adventures with the boys. Experiencing things through their eyes and watching their wonderment and sheer joy is one of the greatest parts of being a parent.

A few of our adventures from last year... 

Shark Attack at the Birch Aquarium


Being serenaded by strolling mariachis at the Coyote Cafe in Old Town.
(Their deep fried ice cream is the best - we are sooo going back!)


Who's smile is bigger - the hippo or Garion's?


Dad gets crushed by a prehistoric elephant.
At the San Diego Zoo's Elepehant Odessey


Our little animal lover...good thing they're friendly!


Psst - hey moms! - here's an idea for keeping the house tidy...
Touring the USS Midway


Wondering what memories we'll come home with this time...

Hope you all have a terrific week, and get some sunshine...where ever you are...